0
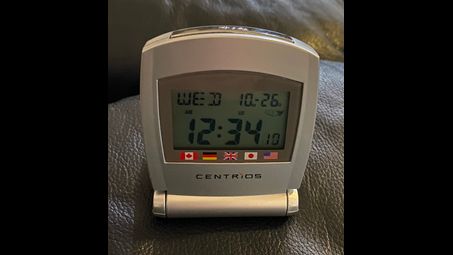
This didn't work for me. Here's what worked for my Centrios Atomic Global travel alarm clock with dual time:
A. Set time zone to "US".
-
In regular time mode (not alarm or dual time modes), press and hold "Set" until the tiny country code, indicating time zone, starts blinking either "JP", "US", "GB", or "DE" for Japan, US, Great Britain, or DEutschland/Germany, respectively.
-
Press "Adjust" repeatedly until "US" is blinking.
-
Press "Set" and the "US" will stop blinking and turn solid.
-
Now you can set the language by pressing "Set" repeatedly to cycle through "GB" for English, "FR" for French, "DE" for German, "ES" for Spanish, and "IT" for Italian.
-
Press "Mode" to return to normal clock mode.
B. Set the specific US time zone.
-
In normal clock mode (NOT alarm or "dual" time modes) displaying the day of the week (such as "WED" for Wednesday), press and release (don't hold) "Set".
-
The day of the week should BRIEFLY change to "PA" in large letters in the upper left, indicating the default Pacific time zone. This will quickly revert to the day of the week! You can leave the Pacific time zone selected, or go to the next step.
-
Before the "PA" disappears, quickly press "Adjust" repeatedly to cycle among "MO", "CE", "EA", and back to "PA", for MOuntain, CEntral, EAstern, and PAcific time zones, respectively. Stop when you reach the desired time zone.
-
After a second or two, the US time zone will revert to the day of the week.
-
Press "Receive" to try to get the time code signal from WWVB in Fort Collins, Colorado, USA. The station is operated by the US government and continuously transmits a low-frequency code that radio-controlled clocks like the Centrios "Atomic Global" travel alarm use to automatically set the time.
-
The time code takes a full minute to transmit/receive, so it can take some time for the clock to set itself. The signal is clearer at night and during cold weather, so be patient. It might help to place the clock over night in a window roughly facing Colorado.
C. Learn more about how these clocks work here:
nist.gov/pml/time-and-frequency-division/time-distribution/radio-station-wwvb/help-wwvb-radio-controlled
What else can I help you with?
How do you find instructions for Sharper Image atomic clock model LM521?
i set my Sharper Image atomic clock model LM521 and it works for several hours but then the time changes to several hours off. clock is plugged in wall and has batteries. no ower surges, etc.
How does one set a Brookstone Automic Clock?
It is easy to set a Brookstone Atomic Clock. First, one must install the batteries. Then, follow the instructions on the screen to set the time to the correct time.
Instructions for SioScan atomic clock Model 86715?
Well, honey, first things first - find the manual. Then, set the time zone, date, and time using the buttons on the clock. Make sure to place the clock in an area with good reception for the atomic signal. And voila, you've got yourself a perfectly synced atomic clock. Now go out there and conquer the world, one precise second at a time!
Instuctions for SkyScan Atomic clock model 87801?
This doesn't answer the question. We can't refer them to another link. Please revise, remove this comment, and resubmit. The instructions for the SkyScan Atomic clock model 87801 can be found here in the form of a .pdf document: skyscanatomicclocks.com/manuals/87800-01.pdfAlso included in this manual is the 87800 model; this manual covers both clocks.
What is the meaning of the atomic clock sync?
The software "Atomic Clock Sync" ensures that ones computer is up-to-date and running the latest versions of all programs. It is free to download from Softpedia.
Where can I obtain instructions for the operation of a Atomic clock?
http://www.lacrossetechnology.com/8117it/manual.pdf This has the instructions for your atomic clock.
How do I turn off alarm on Atomic Centrios clock?
To turn off the alarm on an Atomic Centrios clock, first, locate the "Alarm" button, typically found on the back or side of the clock. Press and hold the "Alarm" button until you hear a beep or see the alarm icon disappear from the display. If your model has a specific "Snooze" or "Off" button, you can use that as well to deactivate the alarm. Finally, check the display to ensure the alarm is no longer active.
How do you set a Vollmond Atomic Wall Clock?
To set a Vollmond Atomic Wall Clock, first install the batteries and wait for it to receive a signal from the atomic clock. Once the time is set automatically, you can manually adjust it if necessary using the buttons on the clock. Refer to the user manual for specific instructions for your model.
How do you find instructions for Sharper Image atomic clock model LM521?
i set my Sharper Image atomic clock model LM521 and it works for several hours but then the time changes to several hours off. clock is plugged in wall and has batteries. no ower surges, etc.
Can you find instructions for setting an atomic clock model?
To set an atomic clock, first ensure it is placed in an area with good reception for the time signal. Follow the manufacturer's instructions, which typically involve pressing a "set" button to enter the setup mode. Use the buttons to select the time zone and adjust the time if necessary. Finally, allow the clock to synchronize with the atomic time signal, which may take a few minutes.
How do you find instructions for SkyScan Atomic Clock model 31310?
http://skyscaninfo.com/content/manuals/33-model-31310t.html
How do you change atomic clock to daylight saving time?
Your Sharp Atomic Clock will adjust automatically for DST since it receives a signal everyday to calibrate the time . See the related link below where you should be able to find the operating instructions for your model .
When was Atomic Clock - album - created?
Atomic Clock - album - was created in 2010.
How does one set a Brookstone Automic Clock?
It is easy to set a Brookstone Atomic Clock. First, one must install the batteries. Then, follow the instructions on the screen to set the time to the correct time.
How do you set atomic clock model 88902?
To set the atomic clock model 88902, typically you'll need to press and hold the "SET" button until the clock enters setup mode. Then use the arrow buttons to adjust the hours, minutes, and other settings as needed. Refer to the clock's manual for exact instructions on setting up your specific model.
Instructions for Timex radio controlled atomic clock?
To set your Timex radio-controlled atomic clock, first ensure it's placed near a window for optimal signal reception. Insert batteries as per the instructions, typically ensuring correct polarity. The clock will automatically search for the atomic time signal; this process may take several minutes. If manual setting is needed, use the mode button to adjust the time, date, and other settings as specified in the user manual.
How do You turn off the alarm on a Sharp atomic clock?
To turn off the alarm on a Sharp atomic clock, locate the alarm switch on the back or side of the clock and set it to the off position. Depending on the model, you may need to press a specific button or sequence to deactivate the alarm. Refer to the user manual for detailed instructions.